How To Build A Chicken Brooder/Hospital
Whether you’re an experienced farmer, a homesteader, or someone who has just started on the journey of raising chickens, having a chicken brooder/hospital for your hens can be a great addition to your coop. Over our time raising chickens, we’ve utilized tote bins, cardboard boxes and even dog cages. However, having a designated brooder/hospital for your chickens can provide a better life for your birds if and when they need it.
Building such an environment may seem daunting, but with the right guidance, it can be a straightforward and rewarding project. In this article, I’ll share how I went about creating a functional brooder box/chicken hospital in our coop.
What is a brooder box? A brooder box is a controlled, warm environment for raising young poultry chicks, providing heat, shelter, and access to food and water until they can regulate their own body temperature.
What is a “chicken hospital”? A chicken hospital is a designated area, often a modified brooder box, for isolating and treating sick or injured chickens, ensuring they receive proper care and medication while being isolated from the flock. It also makes for a great quarantine area for new chickens before integrating them into your flock.
Disclaimer: This article includes affiliate links. If you click one of them, we may receive a small percentage of the sale at no extra cost to you. Thank you for your support!
How Big Does A Chicken Brooder/Hospital Need To Be?
Naturally, these two questions have different answers, largely due to their purpose.
A chicken brooder box will typically host several chicks as they grow. While it’s easy to pack a lot of newly hatched chicks into a small space, a good rule of thumb is to give at least 2 ft2 per chick so that they will continue to have enough space as they grow to a point where they can regulate their body temperature.
A chicken hospital should typically only be as big as it needs to be. We generally don’t want our sick or injured birds moving around too much, so having a tighter space can be a good idea when nursing them back to health. 2-4 ft2 can often be more than enough for a sick chicken.
In our case, since we built a dual-purpose area, I designed it to be 6 ft2 (2’x3′). I can always partition a part off if I need less space for a sick/injured chicken.
Where Should You Build Your Chicken Brooder/Hospital?
A chicken brooder/hospital should be away from the rest of the flock. This can be in an entirely different building or simply away from the main area within the coop.
I built our brooder/hospital right next to the main coop within our workshed, elevated to the level of the roosting bars. This way, the chickens can still see and hear each other, but can’t physically contact each other.
Note that if there’s a bad contagious illness going around, it’s best to isolate sick birds in different buildings altogether. Otherwise, it can be much more accessible to keep them close.
If a bird is particularly ill, we’ll still take it inside and set it up in a tote bin in the basement, sometimes skipping our purpose-built hospital altogether. This allows us to keep the temperature more consistent (much warmer in the winter and cooler in the summer) and to keep a closer eye on it.
Similarly, if it’s too cold to hatch chicks outdoors, even with a heat lamp (it regularly drops below freezing for 5 months of the year here), then we’ll utilize a tote bin in the basement as our brooder.
Chicken Brooder/Hospital Essentials (Inside And Out)
Here are the essentials to have inside the chicken brooder/hospital:
- Warmth – this could simply be the ambient temperature or it could be a heat source like a heat lamp or pad, or even a hot water bottle.
- Water – fresh water is a must, sometimes with added medication, vitamins and minerals.
- Food – ensure you are using the correct food depending on the stage/state of the chicken(s).
When it comes to the health care of our flock, we always keep some essentials on hand:
- Amprol (corid) – a medication used to treat coccidiosis.
- Electrolyte powder – this is very important for dehydrated birds.
- Vitamins and minerals – great for overall health and recovery.
- Vitamin B1 (thiamine) – an important vitamin that is often deficient after treatment with amprol.
- Scrambled eggs and raw egg yolk – highly nutritious and delicious foods for sick chickens.
- Oral syringe – sometimes it’s necessary to syringe feed water and medicine to sick chickens.
- All-purpose ointment – for protection and healing of minor cuts, lacerations, scrapes and sores.
- Bandage – to help keep bacteria from wounds and to brace certain injuries.
- Aspirin – pain management.
- Latex gloves – because things can get messy.
What Supplies You’ll Need
Alright, time to get to building the chicken brooder/hospital. Honestly, I put ours together using scraps from the coop and run projects. That being said, here’s what you may need if you’d like to follow what I did (2’x3’x22″ space):
- 2 – 2×4 x 10′
- 4 – 2×2 x 6′
- 1 – 8’x3′ 1/2″ plywood
- 6 – 1’x2′ x 6′
- 1 latch
- 2 hinges
- 1 carabiner
- Wood screws (#8 – 1 1/4″, 2″ and 3″)
- Power drill with appropriate driver and drill bits
- Level
- Mitre saw
- Tape measure
- Pencil
- Fencing staples
- 13′ x 2′ chicken wire
Alright, with those materials ready, let’s get into building the chicken brooder/hospital!
How To Build A Chicken Brooder/Hospital
Before we get into it, let me reiterate that this is how I built our first chicken brooder/hospital. It’s not the only way to do it.
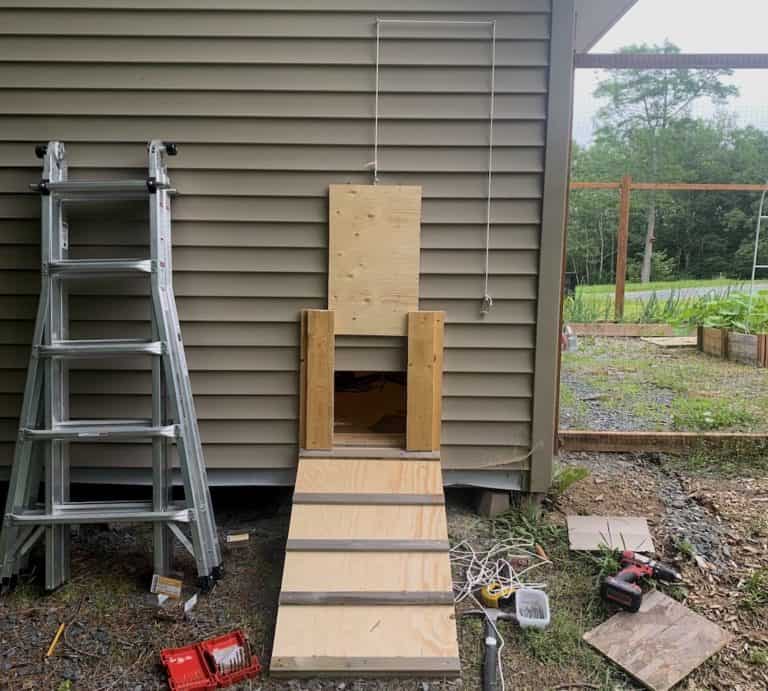
I should note, too, that our coop is actually inside a woodworking shed, and so it was fairly straightforward to build this brooder/hospital attached to the outside of the coop. Your situation is likely different.
First things first, it’s important to try and make your brooder level. If you’re building on the floor, then that’s likely not an issue. I was building ours above the floor so that we could open the brooder while standing and store food and wood shavings underneath it.
Therefore, I made sure the floor bracing I screwed to the coop studs was level:

You’ll notice, too, that I set the height so that the electrical outlet would still be accessible — this outlet now serves as our heat lamp power whenever we have chicks in the brooder.
I measured and cut the first piece to be 3′, and the next piece to be 2′ – 3″ (to account for the 1.5″ at either either end) to end up with a 3’x2′ base. I then added a vertical 2×2 to act as a post for the rest of the build, as you can see below:

Remember that I was just grabbing wood I had lying around, so the height ended up being 4′.
Once I screwed in the post, I finished up the perimeter of the floor, adding a shorter post against the wall to help hold that corner up. I then cut a piece of leftover plywood to fit on top of the frame (I had to cut a bit of the nearside corner to fit it around the main post):

I was trying to work quickly to not make too much noise around the chickens. I think our rooster took it as a challenge!
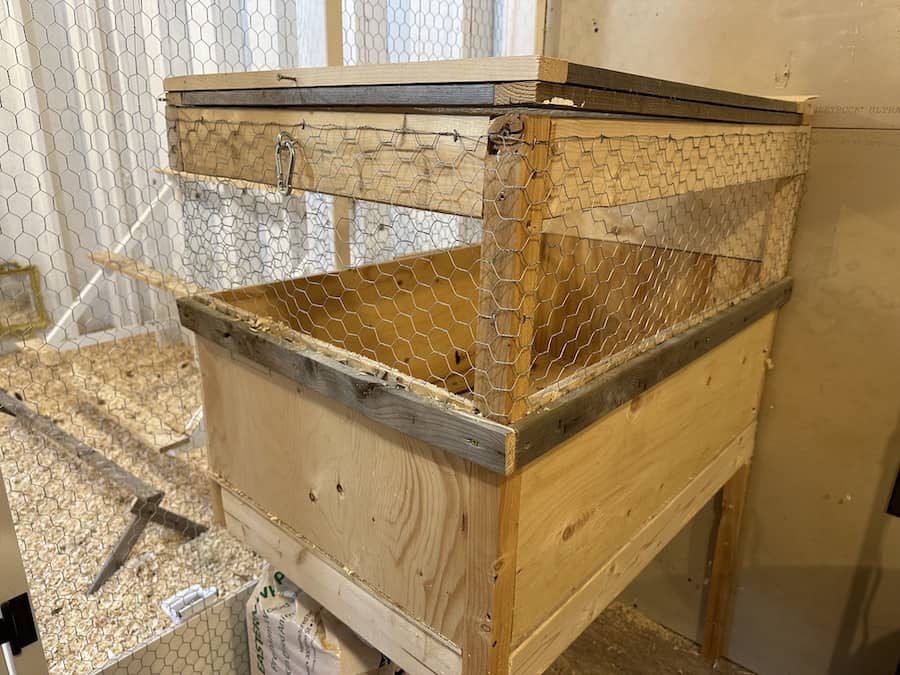
Once the floor was done, I added in the walls, once again, by cutting plywood. The walls sit 11″ above the floor out of both necessity in the materials I had, but also because I wanted to have chicken wire make up some of the overall wall.
The chicken wire would allow us to quickly see through and also insert dowels to hand food and water from, while the plywood portion of the wall would keep shavings inside the brooder.
I also added a second post at the near back corner at the same height as the main post:

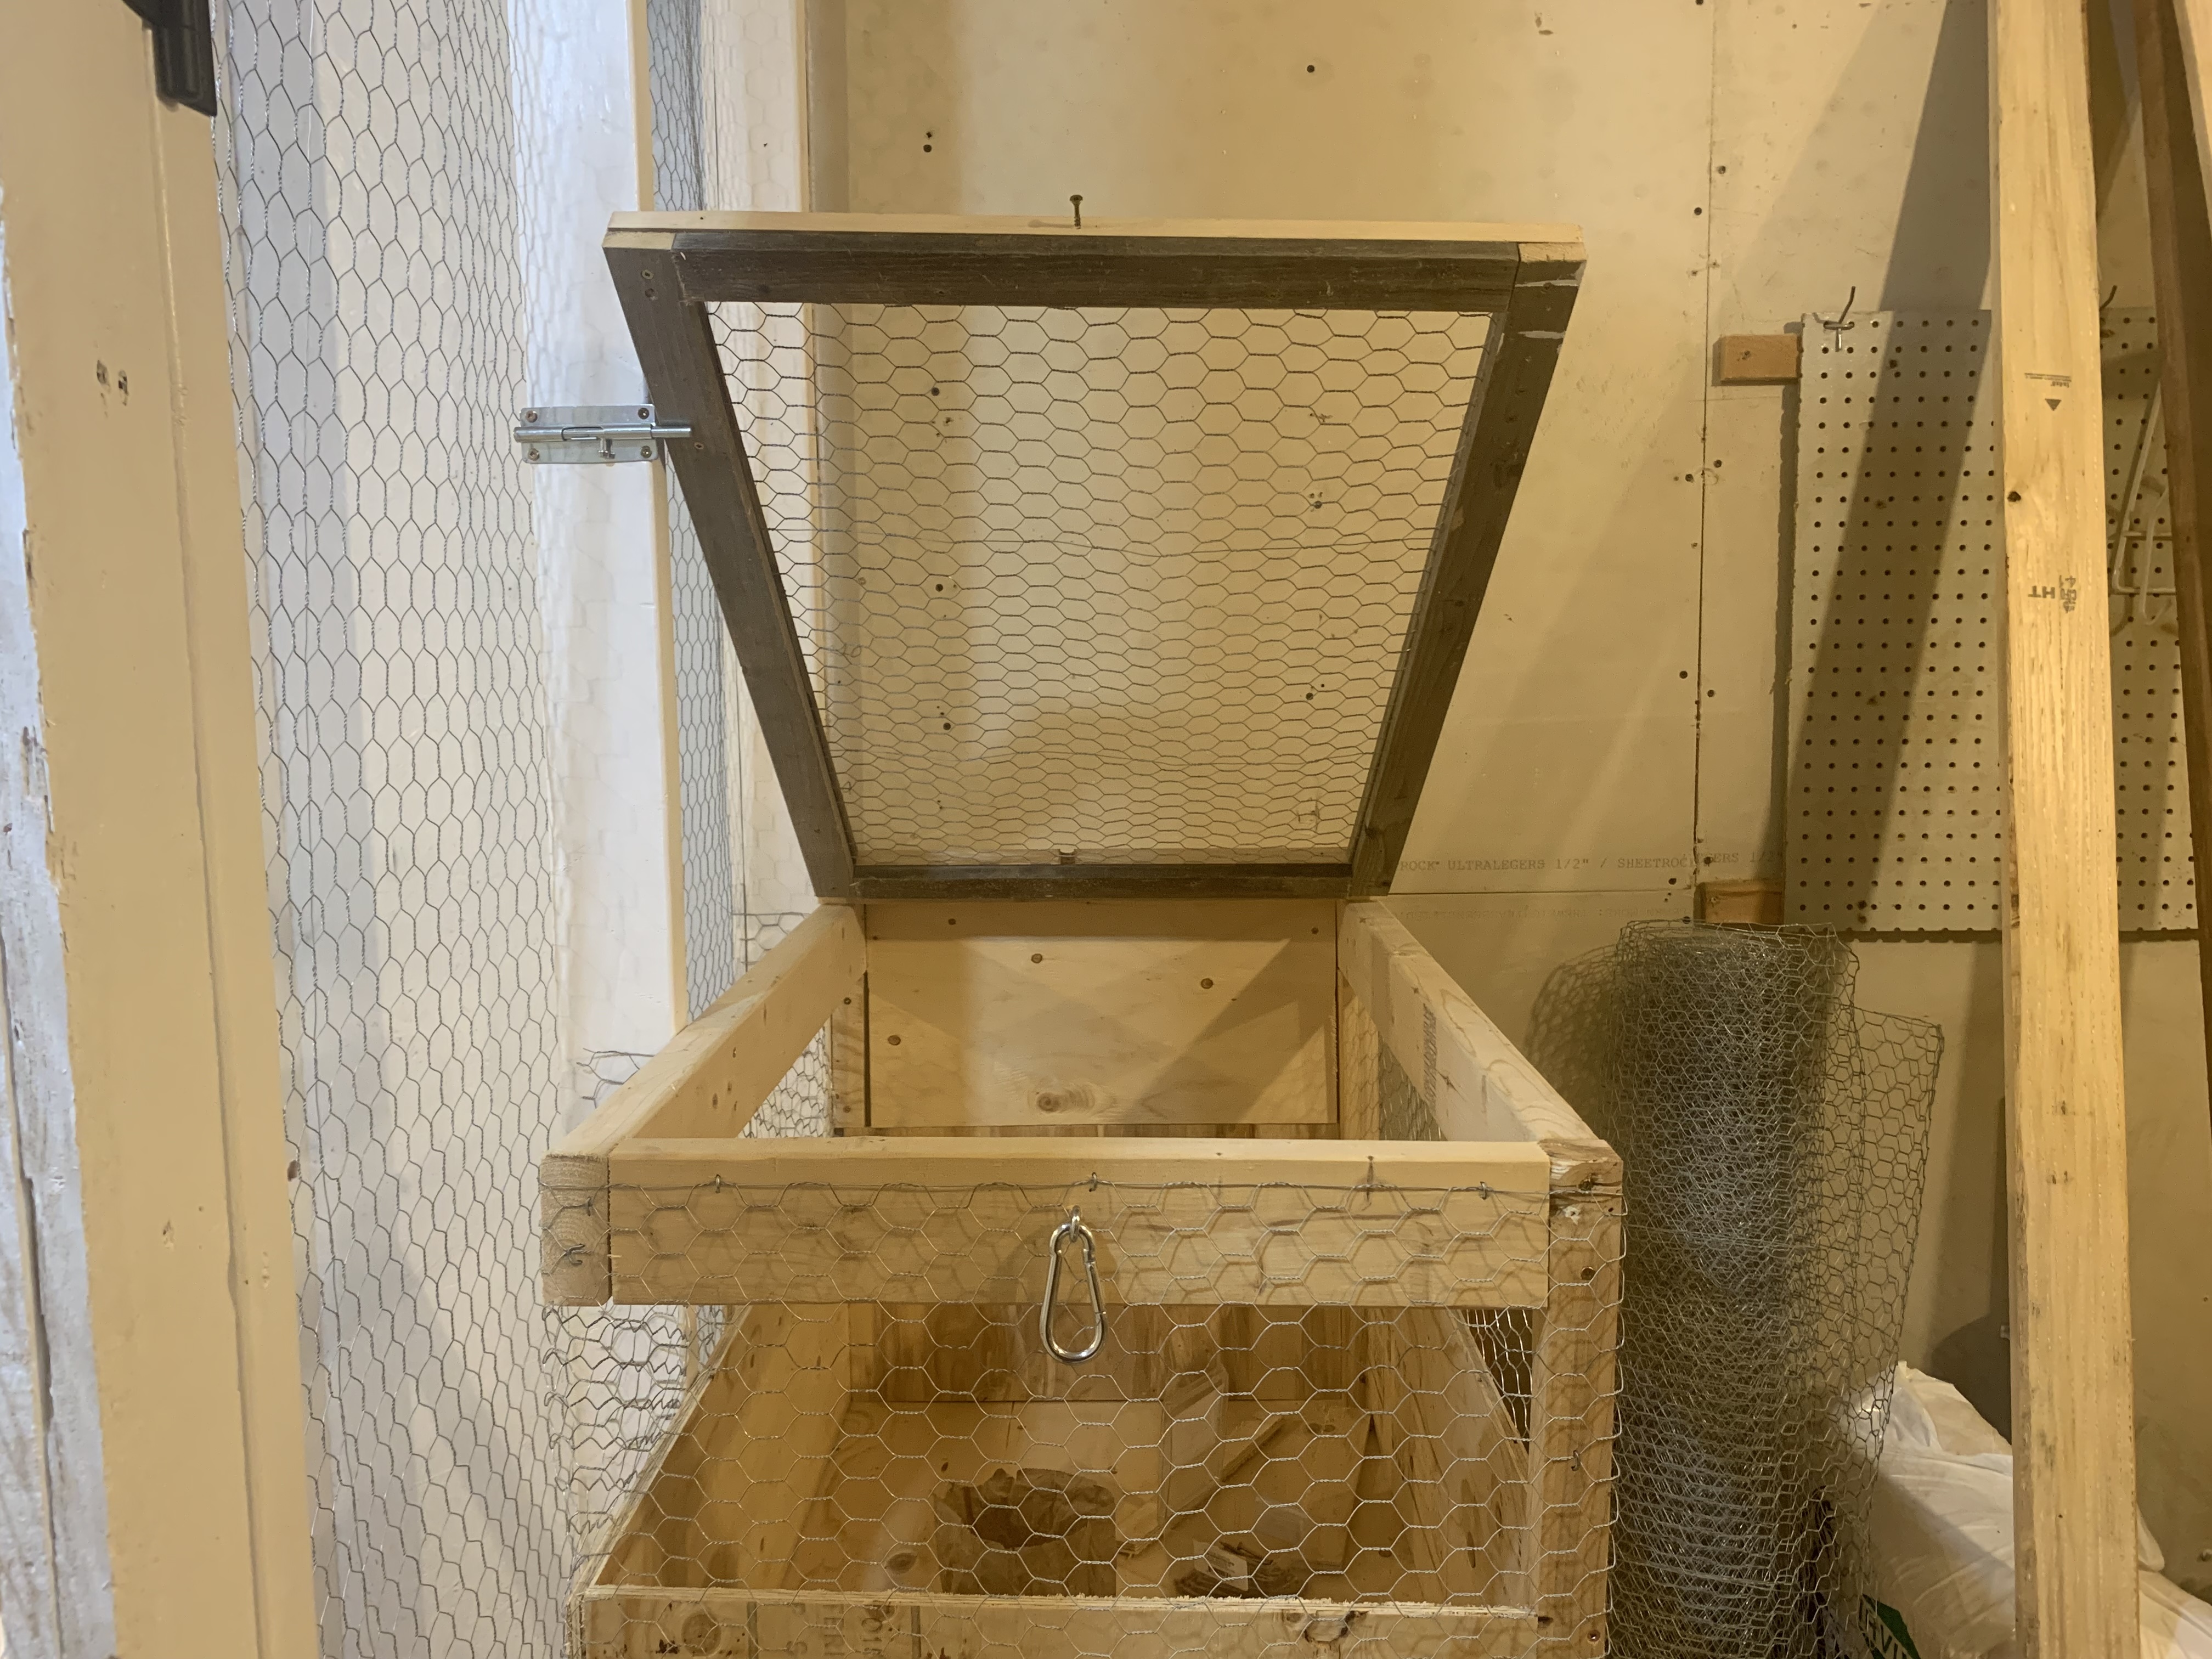
Next, I effectively doubled up the 2×4 frame I did on the bottom up on the top, ensuring everything was level. The total height, from the top of the plywood floor to the top of the 2×4 top frame, is 22″. I then added some 1×2 I had lying around to thicken up the back so that I could attach the lid I was working on.
For the lid, I effectively sandwiched a 2’x3′ (it actually ended up being 2′ x 2′ 10 1/2″ to account for the rear attachment) cut of chicken wire between a 1×2 frame. Therefore, I needed 1.5″ at the very back to hinge the lid onto the top.
Knowing what I know now and having a back wall to hit up against, I would have made the lid even shorter to allow it to sit nicely when open. With this design, there’s not enough of an angle to have it sit, so it falls back down when left to itself. That’s why I included latches on the two coop studs that the brooder touches — to be able to “lock” it in place. You’ll see those show up in an upcoming progress picture.

I used the same basic strategy to install chicken wire around the outside of the brooder box. Fortunately, I had an uncut edge of the chicken wire to work with, length-wise, which meant I could aim it toward the top and not have to hide it underneath anything.
The bottom, however, was cut (and therefore sharp), so I covered it with some 1×2 trim. That way, we won’t cut ourselves or snag our clothing as we’re dealing with birds within the box!
The far side (the side between the box and the coop) was tough to get to, but at the end of the day, nobody’s really going to get caught there. I did manage to cover it, though, by screwing in from the coop side. That way, if we put up a privacy/warmth blanket, then it won’t get torn up on the other side. To ensure that no chicken would be able to get to the drywall, I cut yet another piece of plywood to size and inserted it on the back wall of the brooder.
Lastly, I added an eye hook, screwed the top of the lid, and set up a lock with a carabiner, as you can see from the finished pictures below to help hold the lid open and closed.


And that’s our chicken brooder/hospital, which has come in handy many times, especially in the spring and fall months.
Again, if we get new chicks in the winter, we’ll keep them warm in our basement. Similarly, if one of our chickens is really not feeling well during the winter, we can always opt to take it inside for extra care, temperature regulation, and privacy from the others. But for everything else, this little box is an invaluable part of our coop!